Pages

Monday, June 27, 2011

~My First Tutorial~

Well, here goes my first try at a tutorial...
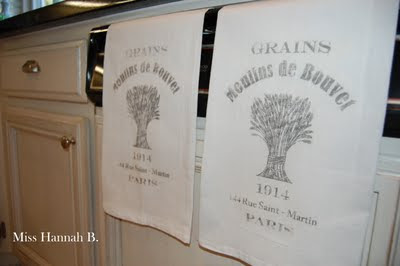
A little explanation first.  I came across this new way (I am not sure if it's new) to transfer an image onto fabric and decided to give it whirl.  It turned out pretty well so here are some photos and the "how-to"!
If you don't want to go through the hassle I mean fun you will be able to purchase the tea towels at "Hoot N' Anny" here in Westlake Village.  I have a few of my items for sale in that adorable shop!


These are the items you need to begin the project:  An image you would like to transfer, Citrosolv - (can be purchased at Wholefoods), Newspaper, Small Bowl, Small Paintbrush, and a Spoon.


1.You will need to find your image. You can find images on any number of websites on the Internet, I found mine at the Graphics Fairy, here, (I am partial to french graphics) and then make a copy of it backwards (easily done in your printer properties menu as an iron-on transfer) 
2.Then take it to your nearest copy center and make a copy of the print backwards on a toner printer.  It has to be printed with a toner printer. (I did mine at Rite Aid, they cost me 15 cents each)
3.Place the copy print side down on your fabric, obviously white fabric will work best with the black ink image.
The picture below has not been done correctly. 


This picture below is correct.  Make sure you tape it down so there is no movement of the picture when transferring.


4.Then you will pour some of the Citrosolv into a small dish (this is potent stuff with a heavy odor-I suggest you do this outside. 
5. With your small brush lightly dip into the Citrosolv and brush all over image.  You don't have to completely saturate it.  
6.Then use the back of your spoon and burnish it (rub the image rather firmly with the back of the spoon)  7.Then take the image off the fabric and let it dry. 
8. Once it is dry go over image with an iron making sure the Citrosolv is gone.
That's it!  


I love them.  It really is an easy way to do an image transfer onto fabric.
Hope you try it!!!

Saturday, June 11, 2011

~Miss Hannah B.'s 13th Birthday Party~

Well, the birthday girl decided to plan her own b-day party this year.  She decided she wanted a scrap booking/sleepover party.  She invited 5 of her best girlfriends, of course she wanted more but I put the kabosh on that one.


She wanted various snacks and drinks to munch on before the pizza arrived.


She decided on vanilla and chocolate cupcakes (the girl loves her cupcakes)


And then there was the scrapbooking part of the party.  These girls came loaded with scrapbook supplies.  They are some serious scrapbookers in the making.
It turned out to be a fantastic idea, they had a blast scrapbooking!!!


This is what the dining room table looked like in the morning...


We took a whole bunch of pictures of the girls together and with the birthday girl, had them printed immediately at the drug store so they could have them to scrapbook.
Here is a shot of them having a picture taken from the floor.


and last but not least a picture of the birthday girl after she had opened her gifts...


The party was a success, a good time was had by all!!!

Thursday, June 2, 2011

~Gorgeous Lilacs~

I am just doing a quick post today.  Things are crazy around here, with the kids birthday's and parties, baseball tournaments, the end of the school year winding down-that means the teachers are piling on last minute work/projects (what are they thinking?) and studing for final exams.  There isn't alot of time to even think.  I am working on getting the pictures ready to post on Hannah's birthday party which we had last weekend and was quite a success, if I say so myself.

So here are some "Lilacs" to look at and hopefully there beauty will take you to a peaceful-calm place like it does me.  I need it for sure right now!


I wish I had these in my yard to enjoy every year!
Related Posts Plugin for WordPress, Blogger...